A quick overview of creating a new project with vue CLI
Vue CLI is a powerful tool, designed to help developers to set up a base project on which they could start building on top of with extreme ease. It offers a bunch of configuration options which caters for different people's preferences and needs. However, as someone who's new to Vue or web development, it could be scary trying to go through the manual setup. This blog post attempts to change that, by explaining each step and give my personal recommendation for each configuration.
Disclaimer: this setup is just what I prefer, it might not fit everyone's needs. Hopefully, it can act as a guideline for anyone who wants to hear a second opinion.
Note: This blog assumes the CLI v3 has already been installed if you would like to find out more info on how to do that check out the official site.
Setup process
Navigate to the ideal location on your development machine, then run the following command in the terminal:
vue create awesome-appThen the rest is just selecting how you'd like this project to be set up. Here are the steps and my choices.
1. Select a preset

I have decided to stick with my custom setup, so I selected "Manually select features"
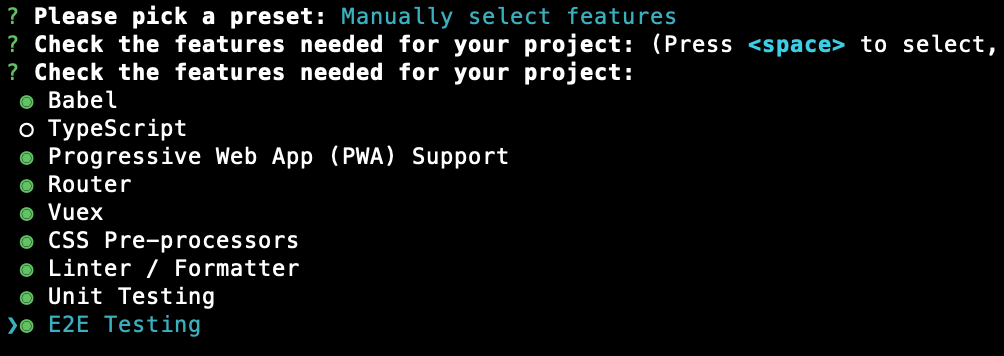
2. Check features needed for your project

Here are my justification for my choices and why:
Babel- transpiles JavaScript for better backwards support. I would even urge people to consider not selecting this, especially if the older browsers support is not a requirement.Typescript- I did not pick this because this is a small prototype app, and I did not want to spend time defining types and etc. But for a large project, I would recommend selecting this option.Progressive Web App(PWA) Support - this is a no brainer, as more browser adopt this standard more and more people will start using this. It is important to have the shell in place even if you don't need to work on it right this minute.Router- is your application going to be a single page application? Or would it benefit from defining different views? The choice is yours, but having this would make the app scale much better in the future and saves troubles of re-introducing this later.Vuex- similar to the above point, depends on the complexity of the app. But because I tend to link applications to a real-time database so I decided to include this.CSS Pre-processors- I hate writing in CSS because it forces you to style the application in a repetitive manner. So I would always suggest to turn this on unless the application requires no styling. E.g. if you are mostly using a components libraryLinter / Formatter- Linter helps to keep code consistent throughout the project, so I'd always recommend this no matter the size of the project. In many cases the linter will be able to auto-fix linting errors, so including it has almost no drawbacks.Unit Testing- unless the application is for demo only, otherwise I'd strongly recommend having unit test in place.E2E Testing- similar to the point above, depends on the use case but strongly recommended.
3. Use history mode for router?

I prefer history mode because it doesn't use the hash in the URL hack e.g. domain.com/#/. But be aware you may need to tweak some file path on production.
4. Pick a CSS pre-processor

I have gone with Stylus because it is pure node.js and doesn't require Ruby to run node-sass for compile SASS/SCSS. But this is just personal preference.
5. Pick a linter / formatter config

I have gone with "ESLint + Prettier", because I can install the Prettier plugin and it let take care of everything. I've tried to go with something like "ESLint + Airbnb config" in the past. But the IDE/Text editor config always clashed with the ESLint config which can be annoying.
6. Pick additional lint features

I selected Lint on save here, but selecting the other choice or not selecting any will also work fine for me.
7. Pick a unit testing solution

Jest wins here hands down, no competition. Having used both, I think Jest is better in every way.
8. Pick a E2E tesing solution

Either of the two options is fine, but I've gone with Cypress because I've used it before.
9. Where do you prefer placing config for Babel, PostCSS, ESLint, etc.?

I'd say always keep your configs separate. It is just simpler, cleaner and easier to find.
10. Save this as a preset for future projects?

This doesn't really matter, but I selected no.
All Done
Once the above steps are done, which will take a while the first time because it needs to pull down all the dependencies, you will be able to serve the application using npm run serve.
Final words
The purpose of this blog post is to give an overview of the manual configs when using Vue CLI. I tried to keep everything simple without going into too many details. If you disagree or have any questions, feel free to get in touch in the comments section below or on hit me up on Twitter!
